


Train Your Own Speech Recognition Model in 5 Simple Steps
A quick tutorial to get ready your own speech recognition model


Introduction
"Artificial Intelligence is the new Electricity"- Andrew Ng
Machine Learning is an exciting branch of computer science that enables solutions to a lot of problems, one of its gems of it is speech recognition. How fascinating it is when you say to your phone for playing some music and it does so just by listening to your voice.
Ever wondered how it is able to detect and recognize your voice so accurately? The answer is simple it runs some kind of neural network inside which is trained on a vast amount of data.
All the speech recognition services which we use in our daily life like Google Assistant, Apple's Siri, and Amazon's Alexa are owned by some tech giants which have a colossal amount of data to train their speech recognition models. To use the services provided by these tech giants we need to pay them for every hit we make to their services. So if you want to make your own speech recognition service and you have enough data why go with these services you can train your own model. Luckily there is one open-source model available which is based on Baidu's Deep Speech research paper and referred to as Mozilla DeepSpeech.
You can train your own DeepSpeech model in five simple steps which I will explain but before that, there are some perquisites for training.
Prerequisites of Mozilla DeepSpeech :
- Python 3.6
- Git Large File Storage
- Mac or Linux environment
- GPU, CUDNN, and CUDA-enabled system
Step 1: Preparing Data
Assuming you have a large amount of data for training the DeepSpeech model in audio and text files, you need to reform the data in a CSV file that is compatible with training it. The desired format of data for training the DeepSpeech model is:
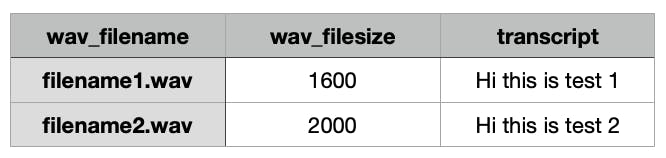
You need to have all your filenames and transcript in this manner. For getting the file size you can use the following code-
from pathlib import Path
filesize = Path('somefile.txt').stat().st_size
print(filesize)
you need to create three CSV files naming train.csv, dev.csv, and test.csv for training, validation, and testing respectively.
Step 2: Cloning the Repository and Setting Up the Environment
Once your data is prepared we can start with installing dependencies and setting up the training environment. Start by cloning the DeepSpeech repository.
git clone -b 'v0.6.0' --single-branch --depth 1 https://github.com/mozilla/DeepSpeech.git
Once you have cloned the repository it's time to set up the environment for training.
## Creating Environment
$ python3 -m venv $HOME/tmp/deepspeech-train-venv/

## Activating Environment
$ source $HOME/tmp/deepspeech-train-venv/bin/activate
By running these commands a virtual environment for training the DeepSpeech model will be created.
Step 3: Installing Dependencies for Training
Once you have activated the training environment you need to install some dependencies for training your DeepSpeech model. Traverse to the DeepSpeech folder which you have cloned in step 2 and run the following:
## traverse to cloned DeepSpeech folder
$ cd DeepSpeech

## Install Requirements
$ pip3 install -r requirements.txt
$ pip3 install deepspeech==0.6.0
$ pip3 install ds_ctcdecoder
$ pip3 install tensorflow-gpu==1.14.0
$ pip3 install -U numpy
$ pip3 install sox
this will install all the requirements for training.
Step 4: Downloading Checkpoint and Creating Folder for Storing Checkpoints and Inference Model
If you want to fine-tune the DeepSpeech model on your data you can download the deep speech 0.6.0 checkpoint from here.
once you have downloaded the checkpoint, create two folders as follows:
## create folder to store checkpoints
$ mkdir fine_tuning_checkpoints

## Create folder to store inferencing model
$ mkdir output_models
Now paste the downloaded checkpoints into the fine_tuning_checkpoints folder. If you want to train a model from scratch there is no need to download the checkpoint but you still need to create those two folders. You have done all the setup for training, the next step is to start training the model.
Step 5: Training DeepSpeech model
If you have completed all the previous steps successfully now is the time for training the DeepSpeech model on your own data. For that you just need to run the following command :
## train deepspeech on your own data
$ !python3 DeepSpeech.py --n_hidden 2048 --checkpoint_dir fine_tuning_checkpoints/ \
--epochs 3 --train_files training_csvs/train.csv --dev_files training_csvs/dev.csv \
--test_files training_csvs/test.csv --learning_rate 0.0001 --export_dir output_models/ \
--use_allow_growth true --use_cudnn_rnn true

## --n_hidden : Number of hidden layers in network
## --checkpoint_dir : Folder path to store checkpoints
## --epochs : Number of Epochs
## --train_files : Path to training CSV
## --dev_files : Path to dev CSV
## --test_files : Path to test CSV
## --learning_rate : Specify learning rate
## --export_dir : Folder path to store inference model
Once you run the mentioned command the training will start. When the training completes the inference model will be stored in the output_models folder with the name output_graph.pb you can use it to test on other data. Follow all these steps and you will be able to train your own DeepSpeech model easily.
References
- [1] Source Code — https://github.com/mozilla/DeepSpeech
- [2] Research Paper —https://arxiv.org/abs/1412.5567
- [3] https://deepspeech.readthedocs.io/en/v0.7.4/TRAINING.html